[Ansible] 変数のテキスト出力をパディングする方法
はじめに
Ansibleでテキストを生成する際に、可変長の変数を使っていても出力をきれいに
そろえる方法を調べたためここに書き残しておく。
予備知識
変数の表示フォーマットはJinja2経由でPythonのメソッドを使うことで定義できる。
Template Designer Documentation — Jinja Documentation (3.1.x)
.formatを使う方法と%を使う方法の2種類があるものの推奨は前者のようだ。
後者は以下のPythonのドキュメントからも分かるとおり古い表現方法らしい。
7. 入力と出力 — Python 3.10.6 ドキュメント
よって今回は.formatを使ってみる。
基本的な使い方
まずは桁ぞろえの前に基本的な使い方から学ぶ。公式ドキュメントはこのあたり。
string --- 一般的な文字列操作 — Python 3.10.6 ドキュメント
"{ 変数0の表示箇所 } { 変数1の表示箇所 }".format( 変数0,変数1 ) と使うようだ。
続いてフォーマットの指定については下記のあたりを参照。
string --- 一般的な文字列操作 — Python 3.10.6 ドキュメント
例えば数字の桁数を指定したい場合は
" { 0:4d } { 1:2d}".format( var_year,var_month ) のようにすればいいらしい。
以上を踏まえたPlaybook例がこちら。
---
- hosts: localhost
  gather_facts: false
  vars:
    date:
      - 2022
      - 7
      - 1
      - 31
  tasks:
    - name: print
      debug:
        msg:
          # 基本形。{}のなかの数字は、format()内に指定した変数群の幾つ目を使うかを指定するもの
          - "{{ 'date1... {0}/{1}/{2}'.format(date[0],date[1],date[2]) }}"
          # format()の変数を左から順に使う場合はこのように{}内の数字を省略可能
          - "{{ 'date2... {}/{}/{}'.format(date[0],date[1],date[2]) }}"
          # このように同じ変数を複数回使いまわす場合は{}内に数字を入れたほうが簡略になる
          - "{{ 'date3... {0}/{1}/{2} - {0}/{1}/{3}'.format(date[0],date[1],date[2],date[3]) }}"
          - "{{ 'date4... {}/{}/{} - {}/{}/{}'.format(date[0],date[1],date[2],date[0],date[1],date[3]) }}"
          # フォーマットを指定したい場合、{}内の数字の後に:で区切って形式を定義する
          - "{{ 'date5... {0:04d}/{1:02d}/{2:02d}'.format(date[0],date[1],date[2]) }}"
          # フォーマットを指定しつつ、date2のように数字を省略した表記方法
          - "{{ 'date6... {:04d}/{:02d}/{:02d}'.format(date[0],date[1],date[2]) }}"
実行結果
TASK [print] *****************************************************
ok: [localhost] =>
  msg:
  - date1... 2022/7/1
  - date2... 2022/7/1
  - date3... 2022/7/1 - 2022/7/31
  - date4... 2022/7/1 - 2022/7/31
  - date5... 2022/07/01
  - date6... 2022/07/01
発展形
先ほどの例では0で数字の桁を揃えたが、これでは使う場面が限定される。
ここからは0以外を使って、かつ変数の右側へのパディングも試してみる。
それには<や>を使う。例を見て頂くのが早い。
- hosts: localhost
  gather_facts: false
  vars:
    product:
      - name: apple
        value: 100
      - name: carrot
        value: 1000
  tasks:
    - name: print
      debug:
        msg:
          - | # まずは何も調整せず出力する例
            {% for item in product %}
            {{ item.name }} {{ item.value }}
            {% endfor %}
          - | # <で変数右側へ半角スペースをパディング。10とすると、全体の文字数が10になるまで足される
            {% for item in product %}
            {{ '{:<10} {:<10}'.format(item.name,item.value) }}
            {% endfor %}
          - | # >で変数左側へ半角スペースをパディング
            {% for item in product %}
            {{ '{:>8} {:>6}'.format(item.name,item.value) }}
            {% endfor %}

          - | # >の後に文字を定義すると、その文字でパディングする。これは「0」でのパディング
            {% for item in product %}
            {{ '{:>8} {:>06}'.format(item.name,item.value) }}
            {% endfor %}

          - | # >の後に文字を定義すると、その文字でパディングする。これは「_」でのパディング
            {% for item in product %}
            {{ '{:_<10} {:<10}'.format(item.name,item.value) }}
            {% endfor %}
実行結果
TASK [print] *******************************************
ok: [localhost] =>
  msg:
  - |-
    apple 100
    carrot 1000
  - |-
    apple      100
    carrot     1000
  - |2-
       apple    100
      carrot   1000
  - |2-
       apple 000100
      carrot 001000
  - |-
    apple_____ 100
    carrot____ 1000
おまけ
引用したPythonのドキュメントを見るとわかるとおり他にも色々とできる。
例えば数値にカンマを入れたり、小数点以下の桁数を指定したり。
- hosts: localhost
  gather_facts: false
  tasks:
    - name: print
      debug:
        msg:
          - "{{ '{:.2f}'.format(1/3) }}"  # 小数点以下を2桁にする
          - "{{ '{:,d}'.format(1000) }}" # 3桁ごとにカンマが入る表記
実行結果
TASK [print] **********************************************
ok: [localhost] =>
  msg:
  - '0.33'
  - 1,000
感想
Ansibleを使ってても時折Pythonの知識は必要になるんだなぁ。
[Ansible] AWX 21.1.0をAWS上へ構築してみた
はじめに
お勉強のためにAWS上へAWX 21.1.0を構築した。
一応動いたのでメモを残すが、AWSもAWXもk8sも素人なので信頼しないでほしい。
なお下記の記事を参考にさせて頂きk3sを採用している。
AWX を AWX Operator でシングルノード K3s にホストする | kurokobo.com
結論
インスタンスを立てた後、とりあえずこの通り入力すれば構築できる。
確認やトラブルを含めた詳細は次以降の節に記載する。
$ sudo dnf -y install git
$ sudo dnf -y upgrade
$ sudo systemctl disable nm-cloud-setup.service nm-cloud-setup.timer
$ sudo curl -sfL https://get.k3s.io | sh -s - --write-kubeconfig-mode 644
$ mkdir kustomize
$ cd kustomize/
$ sudo curl -s "https://raw.githubusercontent.com/kubernetes-sigs/kustomize/master/hack/install_kustomize.sh"  | bash
$ vi kustomization.yaml
apiVersion: kustomize.config.k8s.io/v1beta1
kind: Kustomization
resources:
  # Find the latest tag here: https://github.com/ansible/awx-operator/releases
  - github.com/ansible/awx-operator/config/default?ref=0.22.0

# Set the image tags to match the git version from above
images:
  - name: quay.io/ansible/awx-operator
    newTag: 0.22.0

# Specify a custom namespace in which to install AWX
namespace: awx
$
$ sudo ./kustomize build . | kubectl apply -f -
$ vi awx-demo.yaml
---
apiVersion: awx.ansible.com/v1beta1
kind: AWX
metadata:
  name: awx-demo
spec:
  service_type: nodeport
$
$ vi kustomization.yaml
apiVersion: kustomize.config.k8s.io/v1beta1
kind: Kustomization
resources:
  # Find the latest tag here: https://github.com/ansible/awx-operator/releases
  - github.com/ansible/awx-operator/config/default?ref=0.22.0
  - awx-demo.yaml
# Set the image tags to match the git version from above
images:
  - name: quay.io/ansible/awx-operator
    newTag: 0.22.0

# Specify a custom namespace in which to install AWX
namespace: awx
$
$ sudo ./kustomize build . | kubectl apply -f -
※ 2回目の vi kustomization.yamlは - awx-demo.yamlの行を追記しているだけ
AWSへEC2インスタンスを立てる
まずはインスタンスを立てる。
AMIはRed Hatにし、リソースはAAP2.1やk3sの要件を若干意識した。
Deploying Ansible Automation Platform 2.1 Reference Architectures 2021 | Red Hat Customer Portal
Rancher Docs: Installation Requirements

初期導入済みのパッケージをupdate
とりあえず全体的に最新化しておく。
ライセンス関連の余計なメッセージが出ていたのでついでに消した。
$ sudo dnf -y upgrade
Updating Subscription Management repositories.
Unable to read consumer identity

This system is not registered with an entitlement server. You can use subscription-manager to register.
(出力省略)
$ sudo vi /etc/yum/pluginconf.d/subscription-manager.conf
$ more /etc/yum/pluginconf.d/subscription-manager.conf
[main]
enabled=0
(出力省略)
k3sをインストール
公式の手順どおりに進める。 rancher.com
$ sudo curl -sfL https://get.k3s.io | sh -
(出力省略)
Job for k3s.service failed because the control process exited with error code.
See "systemctl status k3s.service" and "journalctl -xe" for details.
$ systemctl status k3s
● k3s.service - Lightweight Kubernetes
   Loaded: loaded (/etc/systemd/system/k3s.service; enabled; vendor preset: disabled)
   Active: activating (auto-restart) (Result: exit-code) since Sun 2022-06-05 09:40:55 UTC; 449ms ago
     Docs: https://k3s.io
  Process: 69150 ExecStartPre=/bin/sh -xc ! /usr/bin/systemctl is-enabled --quiet nm-cloud-setup.service (code=exited, status=1/FAILURE)
$
インストールは成功したようだがサービスの起動に失敗している。
どうやら下記の作業が必要らしい。firewalldは見当たらないけど。
$ systemctl status firewalld
Unit firewalld.service could not be found.
$ sudo systemctl disable nm-cloud-setup.service nm-cloud-setup.timer
Removed /etc/systemd/system/NetworkManager.service.wants/nm-cloud-setup.service.
Removed /etc/systemd/system/timers.target.wants/nm-cloud-setup.timer.
$ sudo reboot
$ systemctl status k3s
● k3s.service - Lightweight Kubernetes
   Loaded: loaded (/etc/systemd/system/k3s.service; enabled; vendor preset: disabled)
   Active: active (running) since Sun 2022-06-05 09:47:37 UTC; 2min 18s ago
(出力省略)
$
AWXをインストール
AWXのドキュメントを参照すると、インストールにはAWX Operatorを使えとある。
どうやらAWXを立てるためのコンテナっぽい。
github.com
AWX Operatorのドキュメントを参照する。
Minikubeではなくk3sをインストールしたため最初は飛ばして、Basic Installから始める。
kustomizeというマニフェスト管理ツールを使う必要があるようだ。
kustomizeのドキュメントを参照して導入しつつ作業を進める。
kustomization.yamlを作成する際は<tag>の部分を忘れずに置き換えること。
$ mkdir kustomize
$ cd kustomize/
$ pwd
/home/ec2-user/kustomize
$ sudo curl -s "https://raw.githubusercontent.com/kubernetes-sigs/kustomize/master/hack/install_kustomize.sh"  | bash
{Version:kustomize/v4.5.5 GitCommit:daa3e5e2c2d3a4b8c94021a7384bfb06734bcd26 BuildDate:2022-05-20T20:25:40Z GoOs:linux GoArch:amd64}
kustomize installed to /home/ec2-user/kustomize/kustomize
$
$ vi kustomization.yaml
$ more kustomization.yaml
apiVersion: kustomize.config.k8s.io/v1beta1
kind: Kustomization
resources:
  # Find the latest tag here: https://github.com/ansible/awx-operator/releases
  - github.com/ansible/awx-operator/config/default?ref=0.22.0

# Set the image tags to match the git version from above
images:
  - name: quay.io/ansible/awx-operator
    newTag: 0.22.0

# Specify a custom namespace in which to install AWX
namespace: awx
$
$ sudo ./kustomize build . | kubectl apply -f -
Error: accumulating resources: accumulation err='accumulating resources from 'github.com/ansible/awx-operator/config/default?ref=0.22.0': evalsymlink failure on '/home/ec2-user/kustomize/github.com/ansible/awx-operator/config/default?ref=0.22.0' : lstat /home/ec2-user/kustomize/github.com: no such file or directory': no 'git' program on path: exec: "git": executable file not found in $PATH
WARN[0000] Unable to read /etc/rancher/k3s/k3s.yaml, please start server with --write-kubeconfig-mode to modify kube config permissions
error: error loading config file "/etc/rancher/k3s/k3s.yaml": open /etc/rancher/k3s/k3s.yaml: permission denied
$
Gitが入ってないからエラーになっている。
入れてから改めて実行する。
$ sudo dnf -y install git
(出力省略)
$
$ sudo ./kustomize build . | kubectl apply -f -
WARN[0000] Unable to read /etc/rancher/k3s/k3s.yaml, please start server with --write-kubeconfig-mode to modify kube config permissions
error: error loading config file "/etc/rancher/k3s/k3s.yaml": open /etc/rancher/k3s/k3s.yaml: permission denied
$
今度はk3sの権限問題が発生した。
冒頭で紹介した記事を参考にしk3sを入れ直してみる。
$ sudo curl -sfL https://get.k3s.io | sh -s - --write-kubeconfig-mode 644
$
$ sudo ./kustomize build . | kubectl apply -f -
namespace/awx created
customresourcedefinition.apiextensions.k8s.io/awxbackups.awx.ansible.com created
customresourcedefinition.apiextensions.k8s.io/awxrestores.awx.ansible.com created
customresourcedefinition.apiextensions.k8s.io/awxs.awx.ansible.com created
serviceaccount/awx-operator-controller-manager created
role.rbac.authorization.k8s.io/awx-operator-awx-manager-role created
role.rbac.authorization.k8s.io/awx-operator-leader-election-role created
clusterrole.rbac.authorization.k8s.io/awx-operator-metrics-reader created
clusterrole.rbac.authorization.k8s.io/awx-operator-proxy-role created
rolebinding.rbac.authorization.k8s.io/awx-operator-awx-manager-rolebinding created
rolebinding.rbac.authorization.k8s.io/awx-operator-leader-election-rolebinding created
clusterrolebinding.rbac.authorization.k8s.io/awx-operator-proxy-rolebinding created
configmap/awx-operator-awx-manager-config created
service/awx-operator-controller-manager-metrics-service created
deployment.apps/awx-operator-controller-manager created
$
$ kubectl get pods -n awx
NAME                                             READY   STATUS    RESTARTS   AGE
awx-operator-controller-manager-c6554d8f-zpblt   2/2     Running   0          3m40s
$ kubectl config set-context --current --namespace=awx
error: open /etc/rancher/k3s/k3s.yaml.lock: permission denied
$
$ sudo kubectl config set-context --current --namespace=awx
sudo: kubectl: command not found
$
AWX Operatorを構築できたようだ。
しかし現在のnamespaceをawxに変更できない。
解決できなかったためあきらめて毎回コマンドに -n awx を付けることとする。
$ vi awx-demo.yaml
$ more awx-demo.yaml
---
apiVersion: awx.ansible.com/v1beta1
kind: AWX
metadata:
  name: awx-demo
spec:
  service_type: nodeport
$
$ vi kustomization.yaml
$ more kustomization.yaml
apiVersion: kustomize.config.k8s.io/v1beta1
kind: Kustomization
resources:
  # Find the latest tag here: https://github.com/ansible/awx-operator/releases
  - github.com/ansible/awx-operator/config/default?ref=0.22.0
  - awx-demo.yaml
# Set the image tags to match the git version from above
images:
  - name: quay.io/ansible/awx-operator
    newTag: 0.22.0

# Specify a custom namespace in which to install AWX
namespace: awx
$
$ sudo ./kustomize build . | kubectl apply -f -
namespace/awx unchanged
customresourcedefinition.apiextensions.k8s.io/awxbackups.awx.ansible.com unchanged
customresourcedefinition.apiextensions.k8s.io/awxrestores.awx.ansible.com unchanged
customresourcedefinition.apiextensions.k8s.io/awxs.awx.ansible.com unchanged
serviceaccount/awx-operator-controller-manager unchanged
role.rbac.authorization.k8s.io/awx-operator-awx-manager-role configured
role.rbac.authorization.k8s.io/awx-operator-leader-election-role unchanged
clusterrole.rbac.authorization.k8s.io/awx-operator-metrics-reader unchanged
clusterrole.rbac.authorization.k8s.io/awx-operator-proxy-role unchanged
rolebinding.rbac.authorization.k8s.io/awx-operator-awx-manager-rolebinding unchanged
rolebinding.rbac.authorization.k8s.io/awx-operator-leader-election-rolebinding unchanged
clusterrolebinding.rbac.authorization.k8s.io/awx-operator-proxy-rolebinding unchanged
configmap/awx-operator-awx-manager-config unchanged
service/awx-operator-controller-manager-metrics-service unchanged
deployment.apps/awx-operator-controller-manager unchanged
awx.awx.ansible.com/awx-demo created
$
$ kubectl logs -f deployments/awx-operator-controller-manager -c awx-manager -n awx
(出力省略。数分かかった)
----- Ansible Task Status Event StdOut (awx.ansible.com/v1beta1, Kind=AWX, awx-demo/awx) -----


PLAY RECAP *********************************************************************
localhost                  : ok=63   changed=0    unreachable=0    failed=0    skipped=46   rescued=0    ignored=0


----------
^C
$
$ kubectl get pods -l "app.kubernetes.io/managed-by=awx-operator" -n awx
NAME                      READY   STATUS    RESTARTS   AGE
awx-demo-postgres-0       1/1     Running   0          10m
awx-demo-fb89f8dd-brz9b   4/4     Running   0          9m54s
$
$ kubectl get svc -l "app.kubernetes.io/managed-by=awx-operator" -n awx
NAME                TYPE        CLUSTER-IP    EXTERNAL-IP   PORT(S)        AGE
awx-demo-postgres   ClusterIP   None          <none>        5432/TCP       10m
awx-demo-service    NodePort    10.43.3.153   <none>        80:30080/TCP   10m
$
$ kubectl get secret awx-demo-admin-password -o jsonpath="{.data.password}" -n awx | base64 --decode
(ここにパスワードが表示される)$
正常に完了したようです。
アクセスしてみる
まずはセキュリティグループに穴をあける。
対象のポート番号は先ほどkubectl get svcで確認したもの。

http://インスタンスのパブリックIP:30080/ でアクセス。
パスワードにはkubectl get secretで確認した値を入力。

ログイン成功。
これでやっとひと段落です。

あとはGitHub等と連携してProjectを作成すればいいが、ひとまずここまで。
因みにローカルにPlaybook置いて読み込ませる方法はわからなかった。
コンテナの/var/lib/awx/projects/配下に配置すればいいと思ったのだが。
所感
自分に知識が無いからだが、AWXを触りたいだけなのにタライ回しにされた感が強い。
[Ansible] ansible_hostのIPをPlayの途中で変更する方法
はじめに
Ansibleはansible_hostで定義したIPで対象ノードへ接続する。
ただNW機器の障害試験を自動化したい場合など、障害ケースによっては
指定のIPへ接続できない状況も起こりうる。
別名&別IPでinventoryを定義して一時的に使い分けてもいいが、それだとファイルや
フォルダ名に{{ inventory_hostname }} を使いたい場合に名称が変わってしまう。
そこでinventory_hostnameはそのままにansible_hostの値を変更してみる。
実装方法
非常に単純で、set_factで書き換えてしまえばいい。
以下に例を示す。
構成
- ×印の箇所をPlayの途中でdisableにする。

playbook
- 最初は
192.168.56.101で接続して状態を確認する - 途中で
ansible_hostを10.10.10.254へ変更する 192.168.56.101をdisableにする
---
- hosts: rt1
  gather_facts: false
  tasks:
    - name: check ansible_host
      debug:
        var: hostvars['rt1']['ansible_host']

    - name: show interfaces
      vyos_command:
        commands:
          - show interfaces
      register: res_interfaces

    - name: print interfaces
      debug:
        var: res_interfaces.stdout

### ここでansible_hostを変更。
### 変数はホストごとに個別管理されるため、
### hosts: rt1 のPlayにTaskを書かないとうまくいかない点に注意。
    - name: modify ansible_host
      set_fact:
        ansible_host: 10.10.10.254

    - name: check ansible_host
      debug:
        var: hostvars['rt1']['ansible_host']

    - name: disable interface
      vyos_config:
        lines:
          - set interface ethernet eth0 disable

    - name: show interfaces
      vyos_command:
        commands:
          - show interfaces
      register: res_interfaces

    - name: check ansible_host
      debug:
        var: res_interfaces.stdout
実行結果
PLAY [rt1] ***********************************************************************************************************************

TASK [check ansible_host] ********************************************************************************************************
ok: [rt1] =>
  hostvars['rt1']['ansible_host']: 192.168.56.101

TASK [show interfaces] ***********************************************************************************************************
ok: [rt1]

TASK [print interfaces] **********************************************************************************************************
ok: [rt1] =>
  res_interfaces.stdout:
  - |-
    Codes: S - State, L - Link, u - Up, D - Down, A - Admin Down
    Interface        IP Address                        S/L  Description
    ---------        ----------                        ---  -----------
    eth0             192.168.56.101/24                 u/u
    eth1             10.10.10.254/24                   u/u
    eth2             20.20.20.254/24                   u/u
    lo               127.0.0.1/8                       u/u
                     ::1/128

TASK [modify ansible_host] *******************************************************************************************************
ok: [rt1]

TASK [check ansible_host] ********************************************************************************************************
ok: [rt1] =>
  hostvars['rt1']['ansible_host']: 10.10.10.254

TASK [disable interface] *********************************************************************************************************
changed: [rt1]

TASK [show interfaces] ***********************************************************************************************************
ok: [rt1]

TASK [check ansible_host] ********************************************************************************************************
ok: [rt1] =>
  res_interfaces.stdout:
  - |-
    Codes: S - State, L - Link, u - Up, D - Down, A - Admin Down
    Interface        IP Address                        S/L  Description
    ---------        ----------                        ---  -----------
    eth0             192.168.56.101/24                 A/D
    eth1             10.10.10.254/24                   u/u
    eth2             20.20.20.254/24                   u/u
    lo               127.0.0.1/8                       u/u
                     ::1/128

PLAY RECAP ***********************************************************************************************************************
rt1                        : ok=8    changed=1    unreachable=0    failed=0    skipped=0    rescued=0    ignored=0
別解 add_host
add_hostモジュールでも同じことが可能。
Playbook
---
- hosts: rt1
  gather_facts: false
  tasks:
    - name: check ansible_host
      debug:
        var: hostvars['rt1']['ansible_host']

    - name: show interfaces
      vyos_command:
        commands:
          - show interfaces
      register: res_interfaces

    - name: print interfaces
      debug:
        var: res_interfaces.stdout

### ここでansible_hostを変更。
### add_hostならこのようにhostsがrt1以外のPlayで実行しても上手くいく
### (もちろんrt1が対象のPlayでも上手くいく)
- hosts: localhost
  gather_facts: false
  tasks:
    - name: modify ansible_host
      add_host:
        name: rt1
        ansible_host: 10.10.10.254

- hosts: rt1
  gather_facts: false
  tasks:
    - name: check ansible_host
      debug:
        var: hostvars['rt1']['ansible_host']

    - name: disable interface
      vyos_config:
        lines:
          - set interface ethernet eth0 disable

    - name: show interfaces
      vyos_command:
        commands:
          - show interfaces
      register: res_interfaces

    - name: check ansible_host
      debug:
        var: res_interfaces.stdout
実行結果
PLAY [rt1] ***********************************************************************************************************************

TASK [check ansible_host] ********************************************************************************************************
ok: [rt1] =>
  hostvars['rt1']['ansible_host']: 192.168.56.101

TASK [show interfaces] ***********************************************************************************************************
ok: [rt1]

TASK [print interfaces] **********************************************************************************************************
ok: [rt1] =>
  res_interfaces.stdout:
  - |-
    Codes: S - State, L - Link, u - Up, D - Down, A - Admin Down
    Interface        IP Address                        S/L  Description
    ---------        ----------                        ---  -----------
    eth0             192.168.56.101/24                 u/u
    eth1             10.10.10.254/24                   u/u
    eth2             20.20.20.254/24                   u/u
    lo               127.0.0.1/8                       u/u
                     ::1/128

PLAY [localhost] *****************************************************************************************************************

TASK [modify ansible_host] *******************************************************************************************************
changed: [localhost]

PLAY [rt1] ***********************************************************************************************************************

TASK [check ansible_host] ********************************************************************************************************
ok: [rt1] =>
  hostvars['rt1']['ansible_host']: 10.10.10.254

TASK [disable interface] *********************************************************************************************************
changed: [rt1]

TASK [show interfaces] ***********************************************************************************************************
ok: [rt1]

TASK [check ansible_host] ********************************************************************************************************
ok: [rt1] =>
  res_interfaces.stdout:
  - |-
    Codes: S - State, L - Link, u - Up, D - Down, A - Admin Down
    Interface        IP Address                        S/L  Description
    ---------        ----------                        ---  -----------
    eth0             192.168.56.101/24                 A/D
    eth1             10.10.10.254/24                   u/u
    eth2             20.20.20.254/24                   u/u
    lo               127.0.0.1/8                       u/u
                     ::1/128

PLAY RECAP ***********************************************************************************************************************
localhost                  : ok=1    changed=1    unreachable=0    failed=0    skipped=0    rescued=0    ignored=0
rt1                        : ok=7    changed=1    unreachable=0    failed=0    skipped=0    rescued=0    ignored=0
所感
動くものの、こういう使い方って想定されるんだろうか。
[Ansible] Jinja2テンプレートの役割と使い方
はじめに
AnsibleにおけるJinja2テンプレートの役割について自分なりの理解を纏めてみました。 Ansible触りたての方がイメージを掴む参考になれば幸いです。
AnsibleにおけるJinja2テンプレートとは
順を追って確認してみる。
そもそも、Jinja2テンプレートってなんなのか
Jinja2の公式サイトには下記のように掲げられている。
Jinja — Jinja Documentation (3.0.x)
Jinja is a fast, expressive, extensible templating engine. Special placeholders in the template allow writing code similar to Python syntax. Then the template is passed data to render the final document.
抑えたいのは下記の点。なお括弧内は勝手な補足。
じゃあ、AnsibleにおけるJinja2の役割ってなんなのか
Ansibleの公式サイトでは下記のように説明されている。
Templating (Jinja2) — Ansible Documentation
As already referenced in the variables section, Ansible uses Jinja2 templating to enable dynamic expressions and access to variables.
「AnsibleはJinja2テンプレートを使うことで動的な式や変数の参照を可能にする 」
という意味合いのことが書かれている。
ということは
以上を踏まえるとAnsibleにおけるJinja2テンプレートの役割は下記のとおりとなる。
Playbook記述形式であるYAMLは動的な式や変数の参照に対応していない。
それでは不便なのでJinja2テンプレートを用いてその仕組みを実装している。
どの箇所がJinja2テンプレートなのか
Jinja2テンプレートの役割は分かったけど、Playbookのどの箇所がJinja2なのか。
ざっくり言うと "{{ 文(変数等) }}" や "{% 式 %}" の書式で表される箇所になる。
一例を挙げてみる。
- Playbook
---
- hosts: localhost
  gather_facts: false
  tasks:
    - name: print
      debug:
        msg: “It's {{ season }}. An {{ name }} costs {{ cost }}”
      vars:
        season: "winter"
        name:  "peach"
        cost: "{% if season == 'fall' %}100{% else %}200{% endif %} now."
- 実行結果
TASK [print] ****************************************************
ok: [localhost] =>
  msg: “It's winter. An peach costs 200 now.”
このようになる。
Playbookでよく見る{{ }}の表記はYAMLというよりJinja2の構文なのです。
Jinja2構文の色々な使い方
上記のようにPlaybook内に構文を直接記載する以外にも幾つかの使い方がある。
外部ファイルに記述されたJInja2構文を使う
Ansibleのlookupプラグインにより、外部ファイルに記述されたJinja2構文を利用できる。
- Playbook
---
- hosts: localhost
  gather_facts: false
  tasks:
    - name: print
      debug:
        msg: “It's {{ season }}. An {{ name }} costs {{ cost }}”
      vars:
        season: "winter"
        name:  "peach"
        cost: "{{ lookup('template', './test.j2') }}"
- jinja2テンプレートファイル
$ more test.j2
{% if season == 'fall' %}100{% else %}200{% endif %} now.
Playbook内に記述する場合と違い、全体をダブルクォートで囲む必要はない。
- 実行結果
TASK [print] ****************************************************
ok: [localhost] =>
  msg: “It's winter. An peach costs 200 now.”
複雑な構文になる場合は外部ファイルへ切り出したほうが
Playbook自体は簡潔になる。
Jinja2の処理結果を外部ファイルへ出力する
これまでは処理結果をPlaybook内で利用していたが、
外部ファイルへ出力することもできる。
- Playbook
---
- hosts: localhost
  gather_facts: false
  tasks:
    - name: Output to file
      template:
        src: ./test.j2
        dest: ./test.txt
      vars:
        season: "winter"
        name:  "peach"
- jinja2テンプレートファイル
$ more test.j2
It's {{ season }}.
An {{ name }} costs {% if season == 'fall' %}10{% else %}20{% endif %} now.
- 実行結果
TASK [Output to file] **********************************************
changed: [localhost]
$ more test.txt
It's winter.
An peach costs 20 now.
Taskの実行結果を整形してログとして保存したい場合などに有用。
所感
学び始めのころは全く知識がなく、YAMLとJinja2の区別も
ついていなかったので記事に起こしてみました。
[Ansible] PlaybookのYAML構文を理解する
はじめに
Ansibleを調べ始めたけど、YAML形式がよく分からんという方向けの内容です。
具体的にはハイフンやインデントが何を意味するか見ていきます。
私自身Pythonにあまり詳しくないこともあり、正しくない表現があるかもしれません。
あくまでもイメージを掴むためのものとしてご覧ください。
使われるデータ型(変数の形式)
まずはAnsibleで使用されるデータ型とその表現方法をざっくり整理します。
AnsibleはPythonで実装されているため詳細はPythonのデータ型を調べてみてください。
各データ型のYAMLでの表現
いきなりですが、各データ型をYAMLで表現します。 コメントと併せてご覧ください。
var6についてはイメージ図と併せて見れば分かりやすいかと思います。
var1: 1     # int型:単一要素(整数)を格納
var2: "2"   # string型:単一要素(文字列)を格納
var3: true  # boolean型:単一要素(真偽値)を格納
var4:       # list型:複数要素を格納。各要素にはindexが割り当たる
- "apple"
- "fruit"
- 100
var5:       # dictionary型:複数要素を格納。key: valueのセットとなる
  name: "apple"
  type: "fruit"
  cost: 100
var6:       # list型の中にdictionary型を階層的に定義したパターン
- name: "apple"
  type: "fruit"
  cost: 100
- name: "melon"
  type: "fruit"
  cost: 500
イメージ図

ポイント
下記のあたりを抑えておく。
個人的には最後の点に混乱させられました。
- list型は各要素を1行ずつハイフンで定義する(全要素を1行で表現する形式も有る)
- dictionary型は1行ずつkey: valueで定義する(全要素を1行で表現する形式も有る)
- list型は定義順に各要素へ0始まりの番号(index)が割り当たる
- dictionary型には各要素の順番の概念がない
- ある変数の配下であることはインデントで表現する
- ただし例のとおりlistの各要素はインデントを下げなくても問題ない
Playbookの読み解き
以上の内容を踏まえ、ここからはPlaybookのサンプルを読み解いてみます。
実施したい作業

用意したplaybook
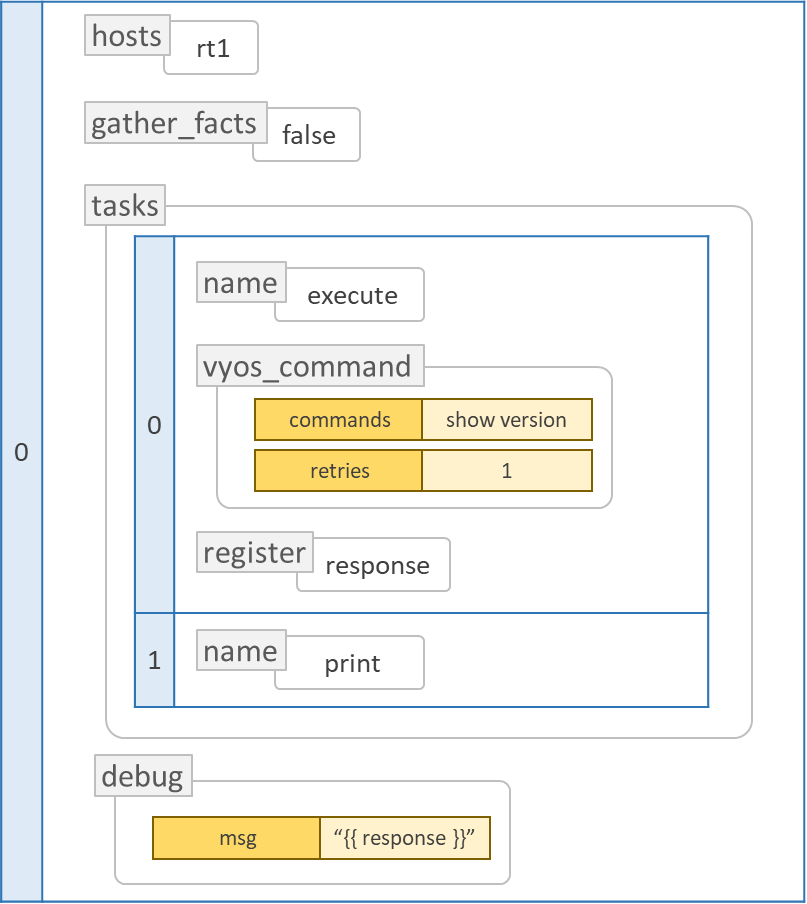
上図の作業をPlaybookで表現するとこうなります。
モジュールの内容等は主題から外れるのであまり気にせず、全体の形を見てください。
---
- hosts: rt1
  gather_facts: false
  tasks:
  - name: execute
    vyos_command:
      commands: show version
      retries: 1
    register: response
  - name: print
    debug:
      msg:  "{{ response }}"

- hosts: rt2
  gather_facts: false
  tasks:
  - name: execute
    vyos_command:
      commands: "{{ cmd_list }}"
    vars:
      cmd_list:
        - show version
        - show interface
Playbookをイメージ図にしてみる
どうしてこんな構成になったのか、今一つピンと来ないかもしれません。
そこでイメージ図を起こしてみました。長くなってしまいましたが、大きな単位からPlaybookと1つ1つ紐づけて眺めてみてください。
全体として最初に図示した作業内容と似た形になっていることが分かります。

ここで気になること
ひとまず以上のように表現できましたが、さて、このうち Playbookとしては
どこをどういじると影響が有る、または無いのでしょうか。
データ型の一覧で抑えたうちの下記内容が重要になります。
- list型は定義順に各要素へ0始まりの番号(インデックス)が割り当たる
- dictionary型には各要素の順番の概念がない
- ある変数の配下であることはインデントで表現する
これらを踏まえ幾つか確認してみましょう。
やると影響が有ること
Playbookをいじってみます。見やすくするためrt2は省略です。
list型の要素の順番を入れ替える
- hosts: rt1
  gather_facts: false
  tasks:
  - name: print
    debug:
      msg:  "{{ response }}"
  - name: execute
    vyos_command:
      commands: show version
      retries: 1
    register: response

tasksのリストの順番を入れ替えました。
影響として、結果出力とコマンド実行の動作順序が逆転してしまいます。
これはその時点で存在しない変数 response を参照するためエラーになります。
TASK [print] *********************************************************************************************************************
fatal: [rt1]: FAILED! =>
  msg: |-
    The task includes an option with an undefined variable. The error was: 'response' is undefined

    The error appears to be in '/home/ansible/test/test.yml': line 5, column 7, but may
    be elsewhere in the file depending on the exact syntax problem.

    The offending line appears to be:

      tasks:
        - name: print
          ^ here
階層をずらす
- hosts: rt1
  gather_facts: false
  tasks:
  - name: execute
    vyos_command:
      commands: show version
      retries: 1
    register: response
  - name: print
  debug:
    msg:  "{{ response }}"
debug: のインデントを上げました。
影響として、debugがlistから飛び出ています。
これは不正な構文のためエラーとなります。
ERROR! 'debug' is not a valid attribute for a Play

The error appears to be in '/home/ansible/test/test.yml': line 2, column 3, but may
be elsewhere in the file depending on the exact syntax problem.

The offending line appears to be:

---
- hosts: rt1
  ^ here
やっても影響が無いこと
今度は動作に影響が無いパターンです。こちらもrt2は省略しています。
list型以外の要素の並び順を入れ替える
- gather_facts: false
  tasks:
  - name: execute
    register: response
    vyos_command:
      retries: 1
      commands: show version
  - debug:
      msg:  "{{ response }}"
    name: print
  hosts: rt1

大分ぐちゃぐちゃにしましたが、Playbookの動作には意外と影響ありません。
※ 実行結果は参考として本記事の最後へ掲載
それぞれの階層にある要素や、listの各Index配下の順序に変動が無いためです。
とはいえ非常に読み難いためこのような書き方は全く推奨されません。
所感
自分が最初に戸惑った内容を纏めてみました。
上手く伝わって、Ansible理解の足掛かりになれば幸いです。
参考:正常動作時の出力
Playbook
---
- gather_facts: false
  tasks:
  - name: execute
    register: response
    vyos_command:
      retries: 1
      commands: show version
  - debug:
      msg:  "{{ response }}"
    name: print
  hosts: rt1

- hosts: rt2
  gather_facts: false
  tasks:
  - name: execute
    vyos_command:
      commands: "{{ cmd_list }}"
    vars:
      cmd_list:
        - show version
        - show interface
実行結果
# ansible-playbook -i inventory.ini test.yml

PLAY [rt1] ***********************************************************************************************************************

TASK [execute] *******************************************************************************************************************
ok: [rt1]

TASK [print] *********************************************************************************************************************
ok: [rt1] =>
  msg:
    changed: false
    failed: false
    stdout:
    - |-
      Version:          VyOS 1.4-rolling-202112280317
      Release train:    sagitta

      Built by:         autobuild@vyos.net
      Built on:         Tue 28 Dec 2021 03:17 UTC
      Build UUID:       00fbb68a-9364-48c0-9039-d2a0ec19e39f
      Build commit ID:  4ccdaf58fc7b9b

      Architecture:     x86_64
      Boot via:         installed image
      System type:      KVM guest

      Hardware vendor:  innotek GmbH
      Hardware model:   VirtualBox
      Hardware S/N:     0
      Hardware UUID:    8bd5d9c0-edf3-654f-8d43-b41f82681b81

      Copyright:        VyOS maintainers and contributors
    stdout_lines:
    - - 'Version:          VyOS 1.4-rolling-202112280317'
      - 'Release train:    sagitta'
      - ''
      - 'Built by:         autobuild@vyos.net'
      - 'Built on:         Tue 28 Dec 2021 03:17 UTC'
      - 'Build UUID:       00fbb68a-9364-48c0-9039-d2a0ec19e39f'
      - 'Build commit ID:  4ccdaf58fc7b9b'
      - ''
      - 'Architecture:     x86_64'
      - 'Boot via:         installed image'
      - 'System type:      KVM guest'
      - ''
      - 'Hardware vendor:  innotek GmbH'
      - 'Hardware model:   VirtualBox'
      - 'Hardware S/N:     0'
      - 'Hardware UUID:    8bd5d9c0-edf3-654f-8d43-b41f82681b81'
      - ''
      - 'Copyright:        VyOS maintainers and contributors'

PLAY [rt2] ***********************************************************************************************************************

TASK [execute] *******************************************************************************************************************
ok: [rt2]

PLAY RECAP ***********************************************************************************************************************
rt1                        : ok=2    changed=0    unreachable=0    failed=0    skipped=0    rescued=0    ignored=0
rt2                        : ok=1    changed=0    unreachable=0    failed=0    skipped=0    rescued=0    ignored=0

#
[Windows] 複数宛先へのPing,Traceroute結果を自動保存するバッチ
はじめに
端末からの疎通確認と結果保存を自動化するバッチ。
特徴は下記のとおりです。結局ExPingを使うのがいいかもしれない。
- 複数の宛先へPing,Tracerouteを同時に実行する
- ログを自動的にファイルへ保存する
- かつ、プロンプト上にも結果を出力する
概要
ファイル構成は下記のとおりです。
- 親バッチファイル:疎通先IPを定義する。子バッチファイルを呼び出す役割も持つ。
- 子バッチファイル:疎通確認コマンドを実行し、結果を出力する。
使い方は下記のとおりです。
- 両バッチファイルを同じフォルダへ配置する
- 親バッチファイル内に疎通先IPを定義する
- 親バッチファイルを実行する
中身の説明
実際のバッチファイルです。
コピペで使えますが、remの行は文字化けすると思うので消してください。
親バッチファイル
@echo off

rem バッチファイルのある場所をカレントディレクトリにする
cd /d %~dp0

rem 括弧内に疎通先IPを半角スペース区切りで定義する。
rem IPは変数%%fに格納され、それをChild.batの引数として使用している。
rem f以外に変えてもOKだが2文字以上の名称にはできないようなので注意。
for %%f in (192.168.1.1 192.168.1.2) do (
start Child.bat %%f
)
子バッチファイル
@echo off

rem 実行コマンド関連の変数を定義。コマンドオプションは適宜チューニング
rem %1にはParent.batから渡されたIPが入っている
set DstIP=%1
set PingCommand=ping %DstIP% -w 1
set TracertCommand=tracert -d -w 1000 %DstIP%

rem ログファイル名の変数を定義。
rem 1行目は日付を取得しスラッシュを空へ置換(=削除)
rem 2行目は時刻を取得し空白を0へ置換 9:00:00.00 → 09:00:00.00
rem これをやらないと一桁台の時刻でバッチにエラーが起きる
rem 3行目は上記結果から時,分,秒を切り出し 09:00:00.00→090000
set RunDate=%date:/=%
SET tmp=%time: =0%
SET RunTime=%tmp:~0,2%%tmp:~3,2%%tmp:~6,2%
set Filename= result_%RunDate%_%RunTime%_%DstIP%.txt

rem コマンドを実行しファイルへ追記出力
rem 実行結果しか出力されないためどんなコマンドを打ったか証跡が残らない
rem そこで重要なコマンドについてはechoを実行して別途出力している
rem echo. はただの空行。ログを見やすくするために入れている
hostname              >> %Filename%
ipconfig              >> %Filename%
echo.                 >> %Filename%
echo %PingCommand%    >> %Filename%
%PingCommand%         >> %Filename%
echo.                 >> %Filename%
echo %TracertCommand% >> %Filename%
%TracertCommand%      >> %Filename%

rem ファイルの内容を出力
rem 注意点として、全コマンド完了後に纏めて表示する挙動となる
rem よって疎通NG時はTimeout待ちでなかなか表示されず不安になる
type %Filename%

rem ログの目視確認のため、キーを押すまでウィンドウを閉じないようにする
pause
exit
使用感
両ファイルを配置。

Parent.batを実行。

実行結果を確認できる。
ログファイルの掲載は割愛。実際に試してみてください。

別解
実行コマンドを宛先毎に変えたい場合は下記のようにする。
宛先IP分だけ子バッチファイルを作成する必要がある。
親バッチファイル
@echo off

cd /d %~dp0

rem 同一フォルダにあるchild*.batを全て実行する
for %%f in (Child*.bat) do (
start %%f
)
子バッチファイル
Child1.bat
@echo off

rem DestIPを直接入力
set DstIP=192.168.1.1
set PingCommand=ping %DstIP% -w 1
set TracertCommand=tracert -d -w 1000 %DstIP%
(以下略)
同様に、宛先IP分Child*.batを作る
所感
昔作ったやつを記憶を頼りに再現・ブラッシュアップしてみた。
ExPing以外にも今はWSLやPowerShell等のより高等なものがあるので実用性は微妙だが、
思い出として残しておく。
[Ansible] vars lookupプラグインで階層構造の変数を参照する
はじめに
vars lookupプラグインを使うと参照したい変数名を変数で指定できる。
しかし下記のとおり階層のトップ以外は指定できないようだ。
---
- hosts: localhost
  gather_facts: false
  vars:
    Fruits:
      Name: apple
      Value: 100
    Target_var1: Fruits
    Target_var2: Fru
    Target_var3: Fruits.Name
  tasks:
    - name: print1
      debug:
        msg: "{{ lookup('vars', Target_var1) }}"
    - name: print2
      debug:
        msg: "{{ lookup('vars', Target_var2 + 'its') }}"
    - name: print3
      debug:
        msg: "{{ lookup('vars', Target_var3) }}"
TASK [print1] ********************************************************************************************************************
ok: [localhost] =>
  msg:
    Name: apple
    Value: 100

TASK [print2] ********************************************************************************************************************
ok: [localhost] =>
  msg:
    Name: apple
    Value: 100

TASK [print3] ********************************************************************************************************************
fatal: [localhost]: FAILED! =>
  msg: |-
    The task includes an option with an undefined variable. The error was: No variable found with this name: Fruits.Name

    The error appears to be in '/home/ansible/test/lookup_vars.yml': line 18, column 7, but may
    be elsewhere in the file depending on the exact syntax problem.

    The offending line appears to be:

            msg: "{{ lookup('vars', Target_var2 + 'its') }}"
        - name: print3
          ^ here
対処方法
下記のようにlookupの括弧外で指定できる。
トップレベルの名称は可変だが配下の名称は固定という場合に使える。
---
- hosts: localhost
  gather_facts: false
  vars:
    Fruits:
      Name: apple
      Value: 100
    Target_var: Fruits

  tasks:
    - name: print
      debug:
        msg: "{{ lookup('vars', Target_var)['Name'] }}"
TASK [print] *********************************************************************************************************************
ok: [localhost] =>
  msg: apple
下記のようにリストの番号や辞書のKeyを変数で指定することもできる。
---
- hosts: localhost
  gather_facts: false
  vars:
    Fruits:
      - Name: apple
      - Name: banana
    Target_var: Fruits
    Sub_num: 1
    Sub_key: Name
  tasks:
    - name: print
      debug:
        msg: "{{ lookup('vars', Target_var)[Sub_num][Sub_key] }}"
TASK [print] *********************************************************************************************************************
ok: [localhost] =>
  msg: banana
所感
あんまり役に立つ気はしないけど、折角なので書き留めた。